
Learning how to remove grout from tile is a critical skill for homeowners tackling renovations or repairs. Over time, grout can crack, stain, or harbor mold, diminishing the appearance of your tiles and even compromising their structural integrity. Whether you’re updating a bathroom, refreshing a kitchen backsplash, or repairing a damaged floor, removing old grout is the first step toward a polished, long-lasting finish.
In this guide, we’ll explore five practical methods to remove grout efficiently, from manual techniques to power tools and eco-friendly solutions. You’ll also learn how to avoid damaging your tiles and prepare the surface for regrouting. Let’s dive into the details!
When Should You Remove Grout?
Grout removal isn’t just about aesthetics—it’s a maintenance necessity. Here’s when to prioritize it:
- Visible cracks or gaps: These allow water to seep beneath tiles, risking mold growth or tile loosening.
- Stubborn stains: Discoloration from dirt, mildew, or harsh cleaning products.
- Outdated color: Faded or mismatched grout can make even new tiles look old.
- Tile replacement: Removing grout is essential if you’re replacing individual tiles.
Ignoring damaged grout can lead to costly repairs down the line. Addressing it early saves time and money.
Essential Tools and Materials
Before starting, gather these supplies:
- Manual tools: Grout saw, utility knife, stiff-bristle brush.
- Power tools: Oscillating multi-tool, rotary tool (e.g., Dremel), reciprocating saw.
- Chemicals: Grout remover gel or eco-friendly alternatives like vinegar.
- Safety gear: Gloves, goggles, respirator mask, knee pads.
- Cleaning supplies: Vacuum, sponge, microfiber cloths, bucket.
Pro Tip: If you don’t own power tools, rent them from a local hardware store for single-use projects.
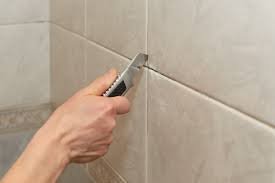
Method 1: Manual Grout Removal (Ideal for Small Spaces)
Manual methods work best for delicate tiles, such as hand-painted ceramics or glass mosaics.
Step 1: Prep the Area
- Clear the workspace and protect adjacent surfaces with painter’s tape.
- Put on safety goggles and gloves.
Step 2: Score the Grout Lines
- Use a grout saw or utility knife to scrape away grout gently.
- Hold the tool at a 45-degree angle and work in short, controlled strokes.
Step 3: Remove Debris
- Vacuum loose particles and wipe tiles with a damp cloth.
Pros:
- Minimal risk of tile damage.
- Budget-friendly (tools cost under $20).
Cons:
- Labor-intensive for large areas.
Method 2: Oscillating Multi-Tool (Fast & Efficient)
An oscillating tool with a grout-removal blade speeds up the process for floors or backsplashes.
Step 1: Attach the Right Blade
- Choose a carbide-grit blade for durability.
- Secure it to the tool according to the manufacturer’s instructions.
Step 2: Adjust Settings
- Start at a low speed to avoid overheating tiles.
- Gradually increase speed if needed.
Step 3: Guide the Tool Along Grout Lines
- Hold the blade parallel to the tile edges.
- Work in 12-inch sections, pausing to clear dust.
Safety Note: Wear a respirator mask to avoid inhaling fine particles.
Pros:
- Cuts removal time by half.
- Works on thick or thin grout lines.
Cons:
- Noisy and generates significant dust.
Method 3: Chemical Grout Removers (For Hardened Grout)
Chemical solutions dissolve stubborn grout without physical scraping.
Step 1: Apply the Product
- Use a small brush to coat grout lines evenly.
- Avoid splashing chemicals on tiles or skin.
Step 2: Let It Sit
- Wait 10–20 minutes (check product guidelines).
- The grout will soften and bubble slightly.
Step 3: Scrape and Clean
- Use a plastic putty knife to lift dissolved grout.
- Neutralize the area with water and baking soda.
Warning: Avoid acidic cleaners on natural stone (e.g., marble, travertine).
Method 4: Steam Cleaning (Gentle and Eco-Friendly)
A steam cleaner uses heat to loosen grout, ideal for moisture-resistant tiles.
Step 1: Prep the Steamer
- Fill the tank with distilled water to prevent mineral buildup.
- Attach a narrow nozzle for precision.
Step 2: Steam the Grout Lines
- Hold the nozzle 1 inch above the grout for 5–10 minutes.
- Move slowly to allow heat penetration.
Step 3: Scrape Softened Grout
- Use a plastic scraper to remove residue.
- Dry the area thoroughly with a towel.
Best For: Bathrooms or kitchens with porcelain or ceramic tiles.
Method 5: DIY Solutions (Vinegar, Baking Soda, or Toothpaste)
For minor stains or eco-conscious homeowners, try these pantry staples.
Step 1: Mix a Cleaning Paste
- Combine equal parts baking soda and water.
- Add 1–2 tablespoons of vinegar for extra power.
Step 2: Apply and Scrub
- Spread the paste over grout lines with an old toothbrush.
- Let it sit for 30 minutes, then scrub in circular motions.
Step 3: Rinse and Dry
- Wipe clean with a damp cloth.
- Repeat for stubborn stains.
Pro Tip: For mildew, add a few drops of tea tree oil to the mix.
Common Mistakes to Avoid
- Skipping protective gear: Grout dust and chemicals can irritate skin and lungs.
- Rushing the process: Aggressive scraping chips tiles.
- Using metal blades on glossy tiles: Opt for plastic or wood tools instead.
Post-Removal Steps
- Inspect tiles: Replace any cracked or loose ones.
- Clean thoroughly: Residual debris weakens new grout adhesion.
- Regrout: Choose sanded grout for lines wider than 1/8 inch.
- Seal the grout: Apply a quality sealer to prevent future stains.
FAQ
Q: Can I regrout over existing grout?
A: No—old grout must be removed to at least two-thirds depth for proper adhesion.
Q: How deep should I remove grout?
A: Aim for 1/8–1/4 inch to ensure the new layer bonds securely.
Q: Is regrouting cheaper than retiling?
A: Yes! Regrouting costs a fraction of full tile replacement.
Final Tips for Success
- Test tools first: Practice on a hidden tile area.
- Work in sections: Tackle small areas to avoid overwhelm.
- Prioritize ventilation: Open windows when using chemicals.
Conclusion
Understanding how to remove grout from tile is a valuable DIY skill that revitalizes your space without professional costs. Whether you choose manual scraping, power tools, or steam cleaning, each method has its strengths. By following safety protocols and working patiently, you’ll achieve clean, grout-free lines ready for a fresh update.
Pingback: Black and White Backsplash Ideas - Timeless Kitchen Designs"
Pingback: Small Walk In Shower Tile Ideas for Compact Bathrooms