
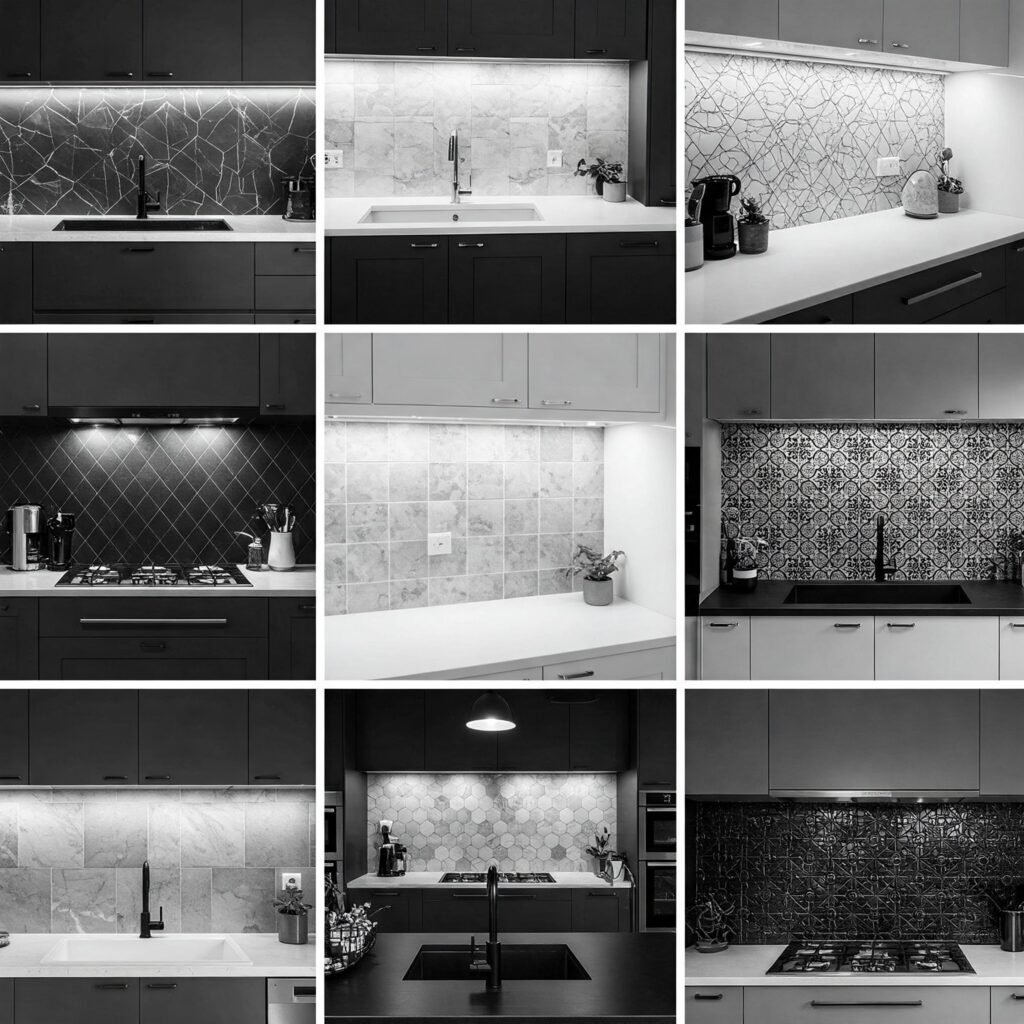
A black and white backsplash offers the perfect marriage of form and function, creating striking visual contrast while providing practical benefits for busy kitchens. This classic color combination has graced homes from Art Deco penthouses to modern farmhouse kitchens, proving its enduring versatility across design eras.
Beyond its aesthetic flexibility, a monochromatic backsplash provides several practical advantages:
- Visual camouflage for cooking splatters and stains
- Timeless sophistication that won’t date your kitchen
- Design versatility to complement any cabinet finish or countertop
- Budget flexibility with options from affordable ceramic to luxury stone
In this comprehensive guide, we’ll explore 15 inspiring design approaches, analyze material options, and provide expert installation advice to help you create a backsplash that combines beauty with everyday functionality.
Material Selection: Choosing the Right Foundation
Ceramic Tile
Best for: Budget-conscious homeowners and DIYers
- Pros: Affordable (
- 3−
- 3−8/sq. ft.), easy to cut, wide style selection
- Cons: More prone to chipping than porcelain
- Maintenance: Simple cleaning with mild detergent
Porcelain Tile
Best for: High-traffic family kitchens
- Pros: Highly durable, stain-resistant, realistic stone looks (
- 5−
- 5−15/sq. ft.)
- Cons: Requires special tools for cutting
- Maintenance: Virtually maintenance-free
Natural Stone
Best for: Luxury kitchen renovations
- Pros: Unique veining, sophisticated appearance (
- 15−
- 15−30/sq. ft.)
- Cons: Requires periodic sealing, heavier weight
- Maintenance: Annual sealing recommended
Glass Tile
Best for: Modern kitchens and accent walls
- Pros: Light-reflecting, vibrant colors (
- 10−
- 10−25/sq. ft.)
- Cons: Shows substrate imperfections, tricky installation
- Maintenance: Streak-free cleaning required
Design Inspiration
1. The Classic Checkerboard
Visual Impact: Retro charm meets graphic punch
Ideal Settings: Cottage kitchens, diner-style spaces
Pro Tip: Use large-format tiles (12″x12″) for contemporary appeal or small mosaics for traditional charm
2. Subway Tile Reimagined
Visual Impact: Clean lines with customizable contrast
Layout Options:
- Traditional brick pattern
- Vertical stack (modern)
- Herringbone (transitional)
- Basketweave (textural)
Grout Selection Guide:
Grout Color | Effect | Best With |
Black | Maximum contrast | White tiles |
Gray | Softened modern | Both colors |
Matching | Seamless look | Contemporary spaces |
Installation Masterclass
Surface Preparation
- Remove existing backsplash completely
- Repair any wall imperfections
- Apply waterproofing membrane in wet zones
- Mark level reference lines
Tile Setting Techniques
- Use notched trowel appropriate for tile size
- Maintain consistent 1/8″ spacing with quality spacers
- Work in manageable 3’x3′ sections
- Check alignment frequently with level
Professional Grouting Tips
- Wait 24 hours after setting tiles
- Choose sanded grout for joints >1/8″
- Work grout diagonally across tiles
- Clean haze with damp (not wet) sponge
- Seal after 72 hours (except epoxy grout)
Cost Analysis and Budget Planning
Material Cost Comparison:
Material | Cost per sq. ft. | DIY Difficulty | Lifespan |
Ceramic | 3− 3−8 | Easy | 10-15 years |
Porcelain | 5− 5−15 | Moderate | 20+ years |
Natural Stone | 15− 15−30 | Difficult | Lifetime |
Glass | 10− 10−25 | Expert | 15-20 years |
Installation Cost Factors:
- Pattern complexity (+15-30%)
- Wall preparation needs
- Special cuts around outlets
- Professional vs. DIY installation
Maintenance and Care Guide
Daily Care:
- Wipe with microfiber cloth
- Use pH-neutral cleaners
- Avoid abrasive pads
Annual Maintenance:
- Re-seal natural stone
- Refresh grout sealer
- Check for loose tiles
Problem Solving:
- Hazy film: Use vinegar solution (1:3 with water)
- Stained grout: Commercial grout cleaner or gentle bleach solution
- Cracked tile: Replace individual tiles with matching spare
Designer Insights: Creating Cohesive Kitchen Style
- Countertop Coordination: Pair marble-look backsplash with quartz counters for unified elegance
- Cabinet Contrast: Dark backsplash pops against white cabinets; reverse for dramatic effect
- Hardware Harmony: Match metal finishes (brushed nickel, brass) throughout space
- Lighting Enhancement: Install under-cabinet lighting to highlight textured patterns
- Scale Considerations: Larger tiles suit spacious kitchens; smaller formats work in compact areas
Frequently Asked Questions
Q: How do I transition backsplash to adjacent walls?
A: Use bullnose trim pieces or continue tile as full wall feature
Q: Can I install over existing tile?
A: Possible if surface is sound, but not recommended for long-term results
Q: What’s the most durable grout option?
A: Epoxy grout offers maximum stain resistance but is harder to work with
Q: How do I protect my backsplash behind the range?
A: Install stainless steel or tempered glass splash guard for easy cleaning
Conclusion: Designing Your Perfect Backsplash
Creating your ideal black and white backsplash involves balancing aesthetic preferences with practical considerations. By understanding material properties, installation requirements, and design principles, you can make informed choices that result in a beautiful, functional kitchen feature.
Remember to:
- Order 10% extra tile for cuts and future repairs
- Save leftover tiles and grout for color matching
- Consider how natural and artificial light affects appearance
- Choose a design you’ll love for years to come
Whether you opt for the graphic punch of checkerboard tile or the subtle elegance of marble-look porcelain, a well-executed black and white backsplash will serve as a timeless centerpiece in your kitchen’s design story.
Winston here from Iowa. I’m always watching for new sites and looking at older ones and thought I’d reach out to see if you could use a hand driving targeted traffic, automating repetitive tasks, or some good old fashioned bulk targeted outreach campaigns to lists I already own.
I’ve been doing this for over 20 years — building sites, editing videos, crafting bulk email campaigns (I even provide the targeted lists as I mentioned), running traffic, creating custom software, fixing and optimizing WordPress sites, I’ll even pay for any plugins you might want/need. If a solution exists, I’ve probably built it or bought it — and if I haven’t, I will for your project. I’m happy to shoulder 90% of the cost with tools, lists, licenses, and tech I already own.
All I ask is a flat $99/month for my time, month to month — no catch. I don’t mean to impose, I just wanted to offer real help if you’re open to it.
Quick background: born and raised in the Midwest, married, three girls. If I can support them by helping you using everything I’ve built over the years, that’s the kind of win-win I can imagine. It still amazes me how few people actually help the way I do — and I’d love the chance to show you.
If you need anything at all, just ask, doesn’t cost anything to do that.
P.S. – If I missed something you might need help with, just ask. I only scratched the surface here.
All the best,
Winston
Cell: 1-319-435-1790
Chat with me anytime: https://kutt.it/deserve
Looking for a simple, fast, and efficient way to finance your business here in the US? Our company offers a business line of credit that can provide you with funds in 24 hours and our process is easy and designed to support businesses with all credit profiles.
But don’t just take our word for it. Consider these facts about our company:
We have financed over $2 billion, demonstrating our commitment and capacity to support businesses like yours.
We are a market leader in $100k to $10MM transactions, which means we have the experience and expertise to handle financing of virtually any size.
We have a 5-star reputation, reflecting our dedication to excellent service and customer satisfaction.
Choose us for your business financing needs and experience the difference of working with a trusted market leader. Let’s take your business to the next level together.
All the best,
National, CGFS
More About Us – https://cutt.ly/mwNPLbyj
How Much Do You Need – https://cutt.ly/rwNPLIAY