
Learning how to remove painted wallpaper can feel daunting, but with the right approach, you can successfully strip it away without damaging your walls. Unlike regular wallpaper removal, painted wallpaper presents unique challenges because the paint creates a protective seal. However, by following proven techniques and using the proper tools, you can master how to remove painted wallpaper efficiently. Whether you’re renovating an entire room or just refreshing a space, this guide will walk you through seven effective methods to tackle even the most stubborn painted wallpaper.
Why Is Painted Wallpaper Hard to Remove?
Painted wallpaper becomes significantly harder to remove because the paint seals the paper fibers and creates a waterproof barrier. This means traditional removal methods like water or steam have trouble penetrating to the adhesive layer. The paint essentially locks everything in place, requiring more aggressive techniques to break through.
There are three main factors that affect difficulty:
- Type of paint used (oil-based is hardest)
- Number of paint layers
- Original wallpaper adhesive type
Tools You'll Need Before Starting
Before attempting to remove painted wallpaper, gather these essential tools:
- Wallpaper scoring tool (paper tiger)
- Large spray bottle or garden sprayer
- Wide putty knife (3-4 inches)
- Wallpaper steamer (optional but helpful)
- Drop cloths or plastic sheeting
- White vinegar or commercial remover
- Safety goggles and gloves
- Step ladder for high areas
Having all tools ready before starting will make the process smoother and prevent mid-project delays.
1. Prepare Your Work Area Properly
Preparation is crucial when learning how to remove painted wallpaper. Start by removing all furniture from the room or covering it with plastic sheeting. Lay drop cloths on the floor to catch falling debris and protect your flooring.
Turn off electricity to the room and remove outlet covers and switch plates. Use painter’s tape to protect any trim, baseboards, or adjacent surfaces you want to keep paint-free. Open windows for ventilation, especially if using chemical removers.
2. Score the Wallpaper Thoroughly
Scoring is the most important step for removing painted wallpaper effectively. Use a wallpaper scoring tool to create thousands of tiny holes through the paint layer. This allows removal solutions to penetrate to the adhesive beneath.
Work in small sections (about 3×3 feet) and apply firm pressure while rolling the scorer in circular motions. You should hear a distinct scratching sound when making proper contact. Avoid pressing so hard that you damage the drywall underneath.
3. Apply Your Removal Solution
After scoring, immediately apply your removal solution. For a DIY option, mix equal parts hot water and white vinegar in a spray bottle. For tougher jobs, use a commercial wallpaper remover solution.
Spray the solution generously onto the scored wallpaper until it’s thoroughly wet but not dripping. Allow it to soak for 10-15 minutes before checking if the paper is ready to scrape. You may need to reapply to stubborn areas.
4. Use a Steamer for Stubborn Sections
For wallpaper that resists liquid solutions, a wallpaper steamer can provide the extra power needed. Fill the steamer with water and allow it to heat up completely. Hold the steam plate about 6 inches from the wall for 30-45 seconds per section.
Move the steamer slowly across the surface, keeping it in place just long enough to loosen the adhesive without oversaturating the drywall. The steam should penetrate through the paint layer when combined with proper scoring.
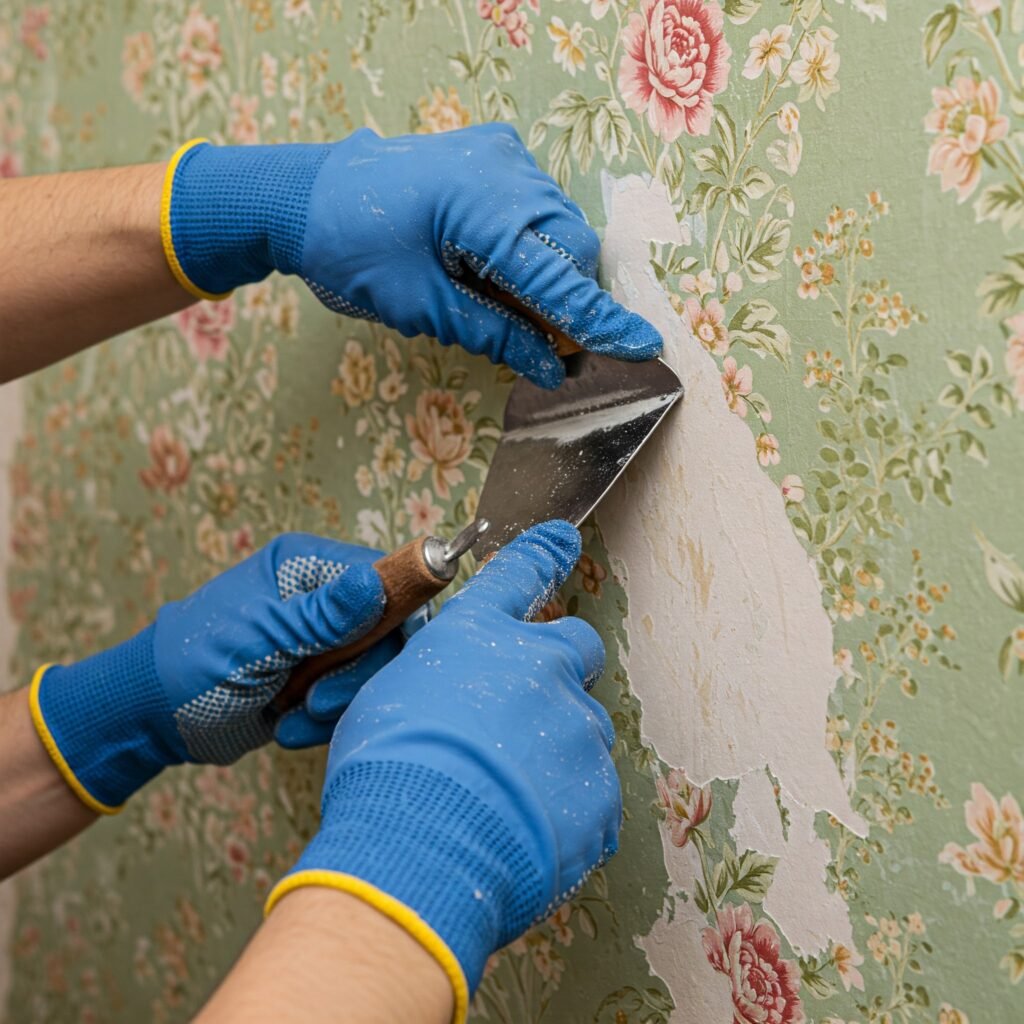
5. Scrape Off the Wallpaper Carefully
Once the wallpaper has softened, begin scraping with a wide putty knife held at a 30-degree angle. Work from the top down in smooth, controlled motions. Apply gentle but firm pressure – let the tool do the work rather than forcing it.
If you encounter resistance, stop scraping and reapply your removal solution. Forcing dry wallpaper can tear the drywall paper facing, creating more repair work later. Remove large sections first, then go back for smaller stubborn pieces.
6. Clean Residual Adhesive Completely
After removing all wallpaper, you’ll likely have leftover adhesive on the walls. Mix a solution of warm water and mild dish soap or use a trisodium phosphate (TSP) cleaner. Scrub the walls with a large sponge or rag, rinsing frequently with clean water.
For particularly stubborn glue spots, use a plastic scrub brush or more concentrated cleaner. Avoid metal scrapers at this stage as they can damage the wall surface. The goal is to remove all sticky residue before proceeding.
7. Repair and Prepare Walls for Finishing
Once the walls are clean and dry, inspect for any damage that needs repair. Small holes or tears can be fixed with lightweight spackle. For larger damaged areas, you may need to apply a thin layer of joint compound.
After repairs dry, sand the entire wall surface with 120-grit sandpaper to create a smooth finish. Wipe away all dust with a damp cloth, then apply a stain-blocking primer before painting or hanging new wallpaper.
Alternative Removal Methods to Consider
If the standard methods aren’t working for your situation, try these alternative approaches:
Fabric softener solution: Mix one part liquid fabric softener with three parts hot water. The softening agents help break down the adhesive.
Dish soap and baking soda: Create a paste with these ingredients to scrub off particularly stubborn sections.
Heat gun: Use carefully on low settings to soften paint and adhesive in small areas. Keep the gun moving to avoid scorching.
Peel-away systems: Commercial products like DIF or Zinsser make concentrated removers specifically for tough jobs.
Common Mistakes to Avoid
Many homeowners make these errors when attempting to remove painted wallpaper:
- Not scoring deeply enough before applying solutions
- Using tools that are too sharp and damage walls
- Not allowing enough soaking time before scraping
- Applying too much force when scraping
- Skipping the adhesive removal step
- Not protecting floors and furniture adequately
- Forgetting to turn off electrical power first
When to Call a Professional
While most painted wallpaper removal is a DIY project, consider hiring a professional if:
- You have multiple layers of wallpaper and paint
- The walls are plaster rather than drywall
- You’re dealing with lead-based paint (common in pre-1978 homes)
- The walls have extensive damage underneath
- You’ve attempted removal but made little progress
Professional wallpaper removers have industrial-grade steamers and scrapers that can handle jobs too difficult for standard home tools.
Estimated Time and Cost
The time required depends on your room size and wallpaper condition:
- Small bathroom (40-50 sq ft): 4-6 hours
- Medium bedroom (120-150 sq ft): 8-12 hours
- Large living room (300+ sq ft): 2-3 days
Costs for DIY removal are primarily tools and materials:
- Basic tools:
- 30−
- 30−50
- Removal solutions:
- 10−
- 10−20
- Repair materials:
- 20−
- 20−40
- Professional removal:
- 2−
- 2−4 per square foot
Final Tips for Success
Follow these additional suggestions to make your painted wallpaper removal go smoothly:
- Work in manageable sections (about 4×4 feet at a time)
- Change your scraping blade frequently for best results
- Keep a bucket of clean water nearby for tool cleaning
- Take breaks to avoid fatigue and frustration
- Play music or podcasts to make the time pass easier
- Enlist a helper for large or high areas
- Be patient – rushing leads to mistakes
Conclusion
Learning how to remove painted wallpaper properly will save you time, frustration, and potential wall damage. While the process requires more effort than removing unpainted wallpaper, methodical preparation and the right techniques will lead to success. Remember to score thoroughly, use appropriate solutions, work carefully, and complete all preparation steps before applying new wall treatments.
With these seven proven methods and tips, you can tackle even the most stubborn painted wallpaper removal projects. The reward will be fresh, clean walls ready for your new decorative vision.