
Replacing deck structures is a major but worthwhile home improvement project. Whether your current deck is worn out, damaged, or just outdated, going through a full replacement can improve safety, functionality, and curb appeal.
In this guide, you’ll learn the nine most essential steps to take when replacing your deck. Whether you’re doing it yourself or hiring professionals, understanding the process will help you make smart decisions and avoid common mistakes.
Replacing Deck vs. Repairing: What's the Right Choice?
One of the first decisions homeowners face is whether to repair or replace. While minor cracks or loose boards can often be fixed, widespread issues like rot, mold, or structural instability usually call for a full replacement.
Signs that replacement is better than repair:
- Rotten or crumbling boards
- Loose or rusted fasteners
- Unstable railings or posts
- Uneven or sagging structure
- Widespread mildew or mold
Choosing to replace instead of patching gives you the chance to update materials, improve design, and add long-lasting value to your outdoor space.
Step 1: Plan Thoroughly Before Starting
Planning is key to a successful project. Start by determining what areas of the deck need to be replaced. Is it just the surface boards, or are the railings and stairs also affected?
Things to consider during the planning phase:
- Measure your existing deck dimensions accurately
- Choose new materials that suit your climate and lifestyle
- Decide whether to keep the existing layout or make changes
- Check if local building permits are needed
- Set a realistic timeline for completion
With a clear plan in place, you’ll avoid delays and unexpected expenses.
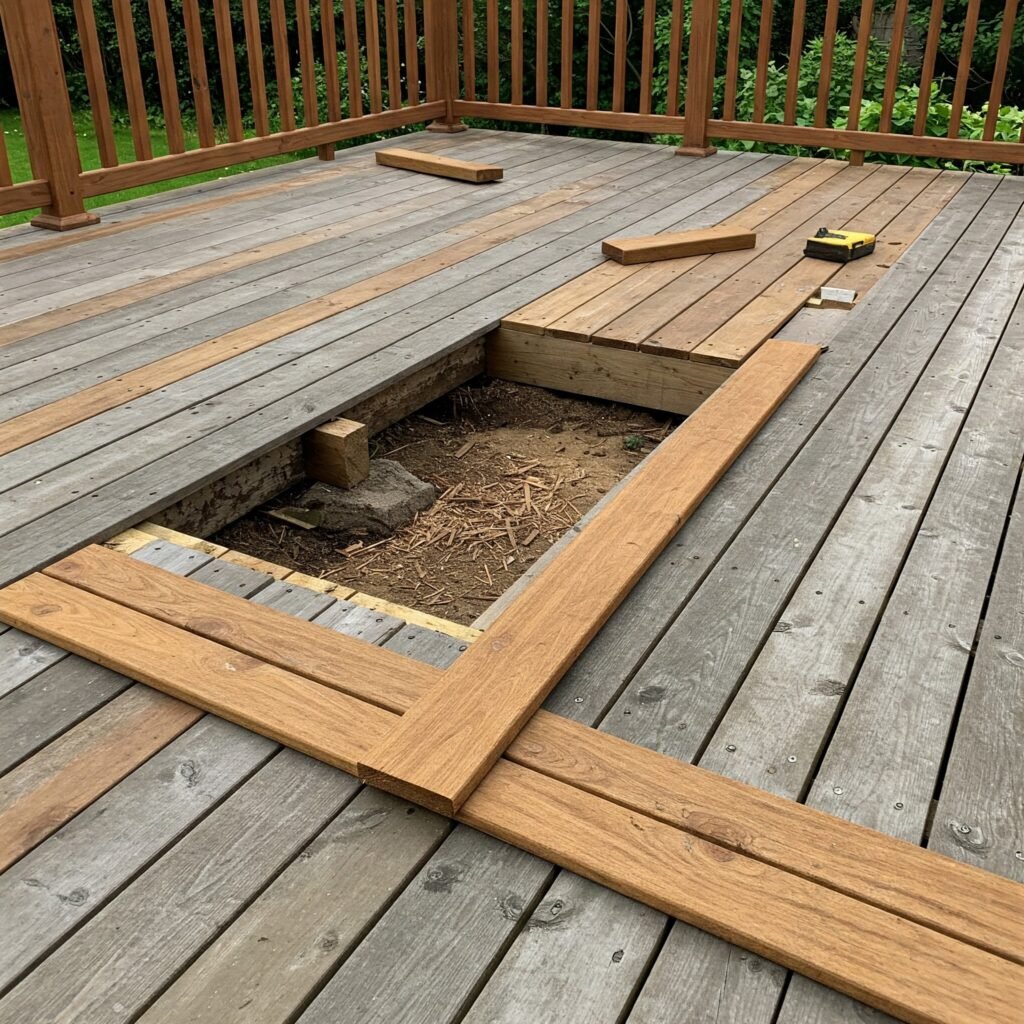
Step 2: Inspect the Frame
Before removing any boards, inspect the entire deck frame. This includes joists, beams, support posts, and the ledger board that attaches the deck to the house.
Use a screwdriver or small tool to check the wood for rot or damage. If it feels soft or breaks easily, it’s no longer structurally sound. Ensure the ledger board is properly bolted into the house with no gaps or signs of movement.
If structural parts of the frame are compromised, replacing those components is necessary before installing new decking.
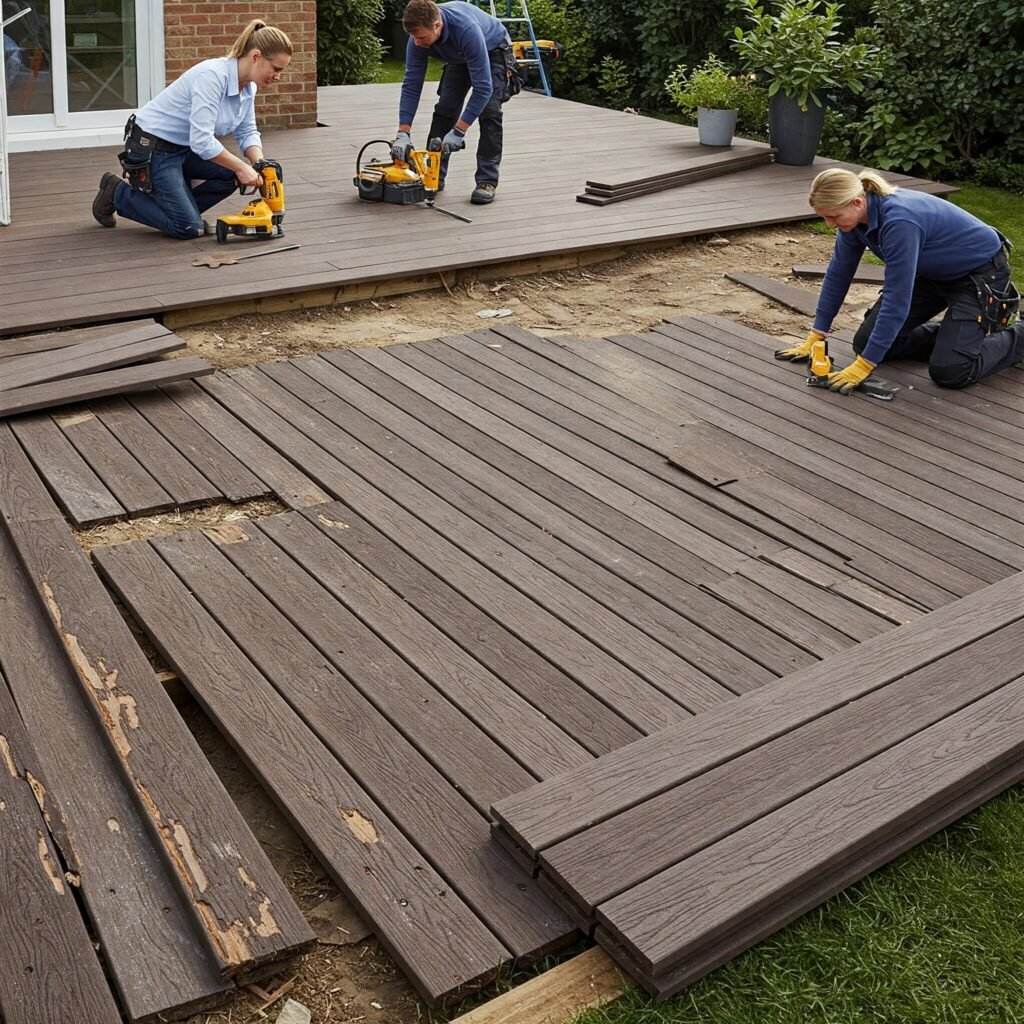
Step 3: Remove Old Decking Safely
The next step is to remove all old boards, nails, and fasteners. This part can be time-consuming but is essential for a clean, solid installation of the new materials.
Tips for efficient removal:
- Use a crowbar or deck board removal tool
- Remove nails and screws fully to prevent interference
- Stack and dispose of old boards properly
Once the deck surface is clear, re-check the frame for any missed damage or areas that need attention before moving on.
Step 4: Choose the Right Materials
Material selection is one of the most important parts of the project. You want to pick something that looks good, fits your budget, and lasts through weather and wear.
Popular deck replacement materials include:
- Pressure-treated wood: Inexpensive and widely available, but requires regular maintenance
- Cedar and redwood: Naturally resistant to decay with a rich, classic look
- Composite decking: Made from recycled materials, very low maintenance, and long-lasting
- PVC decking: Lightweight, waterproof, and durable, though more expensive
Compare prices, maintenance needs, and aesthetics before making a decision. Also, ensure the new boards are compatible with your existing frame.
Step 5: Install the New Deck Boards
Once materials are selected and the frame is confirmed to be in good shape, it’s time to install the new decking.
Best practices for installation:
- Start at the house and work outward
- Maintain even spacing between boards to allow for drainage
- Use corrosion-resistant screws or hidden fasteners
- Cut boards cleanly and securely fasten them to the joists
Keep an eye on the alignment every few boards to avoid misplacement. If using composite materials, follow the manufacturer’s guidelines for spacing and installation.
Step 6: Update the Railings
If the railings are damaged or outdated, now is the perfect time to upgrade them. Modern railing systems can offer better safety and style.
Things to consider when replacing railings:
- Ensure they meet local building codes for height and spacing
- Choose from materials like wood, metal, vinyl, or glass
- Make sure rail posts are firmly attached to the deck structure
- Match the railing style to the new decking for a cohesive look
This part of the process not only improves safety but also enhances the visual impact of your deck.
Step 7: Add Final Touches
With the main structure complete, now is the time for finishing touches that protect and beautify your new deck.
For wood decks:
- Wait a few weeks before applying stain or sealant
- Use products designed for UV protection and water resistance
- Apply with a brush or sprayer for even coverage
For composite and PVC decks:
- Rinse off dust and debris with water
- Check for scratches or marks during installation
Optional additions like skirting, built-in benches, or lighting can enhance both function and design.
Step 8: Replace Stairs and Skirting if Needed
Don’t forget about deck stairs and skirting. These elements often experience the same wear and tear as the main decking and may need replacing too.
When replacing stairs:
- Ensure all treads are even and securely fastened
- Follow code requirements for riser height and handrails
- Use non-slip materials if available
For skirting, choose materials like vinyl lattice, wood panels, or composite boards to keep a uniform appearance and prevent animals from getting underneath.
Step 9: Maintain Your New Deck
Once your new deck is installed, the key to longevity is regular maintenance. A well-maintained deck can last 20 years or more.
- Sweep leaves and debris weekly to avoid mold
- Wash the surface every few months with a mild soap
- Re-seal wood decks every couple of years
- Inspect for loose screws, splintering, or signs of wear
By sticking to a seasonal maintenance routine, you’ll extend the life and beauty of your deck for many years.
Budgeting and Cost Estimates
The cost of replacing a deck depends on the materials, size, and whether you hire help. Here’s a rough estimate of material-only costs for a 300-square-foot deck:
Material Type | Average Cost/Sq. Ft. | Total Material Cost |
Pressure-treated wood | $3 – $6 | $900 – $1,800 |
Redwood/Cedar | $6 – $9 | $1,800 – $2,700 |
Composite | $8 – $12 | $2,400 – $3,600 |
PVC | $10 – $15 | $3,000 – $4,500 |
Labor can add $1,500–$4,000 depending on location and complexity. DIY saves labor costs but takes more time and effort.
DIY vs Hiring a Contractor
Deciding between DIY and hiring a professional depends on your skills, tools, and time availability.
DIY may be suitable if:
- You’re experienced with tools and construction
- The deck layout is simple
- You have time to dedicate to the project
Hiring a contractor is best when:
- The deck is elevated or has structural damage
- Permits and inspections are required
- You want guaranteed quality and safety
Professionals can complete the job faster and handle unexpected issues more easily.
Common Mistakes to Avoid
Many homeowners dive into this project without fully understanding what’s involved. Here are common mistakes to watch for:
- Not inspecting the frame before installing new boards
- Choosing materials that aren’t suitable for the local climate
- Using improper or low-quality fasteners
- Skipping permits or failing to meet local building codes
- Failing to space boards correctly for water drainage
Avoiding these errors can make the difference between a lasting result and one that requires early repair.
Final Thoughts
Replacing your deck is a valuable home improvement project that enhances your living space and increases your home’s value. With proper planning, the right materials, and attention to detail, you can create a safe, stylish, and long-lasting outdoor area.
Take time to plan each phase carefully. Inspect your structure, choose durable materials, and follow installation best practices. With these steps, your new deck will serve as a relaxing and functional retreat for years to come.
Pingback: 7 Joyciano Insights to Transform Your Life Perspective
Pingback: OpenHousePerth.net Insurance: 10 Tips to Find the Best